Scroll Top
Siraya Tech ResinPopular
Days
Hrs
Min
Sec

Follow us...

3D Printing with TGM-7 Resin

AmeraLabs TGM-7 3D printing resin, has been meticulously crafted for producing practical tabletop and gaming miniatures.

AmeraLabs TGM-7 3D printing resin, has been meticulously crafted for producing practical tabletop and gaming miniatures. These miniatures can be used Frequently in tabletop gaming, without the fear of breakage. Delve into the AmeraLabs TGM-7 3D printing resin guide for comprehensive insights.

AmeraLabs TGM-7 3D printing resin  is compatible with both MSLA and DLP 3D printers. MSLA encompasses LCD-based 3D printers such as the Phrozen Sonic Mighty 8K and other Phrozen printers. These printers utilise a LCD screen as a mask along with an underlying LED light source, projecting layers onto the resin Vat’s bottom equipped with FEP film. In contrast, DLP 3D printers employ a DLP projector in lieu of an LCD screen. Notable DLP printers include the Anycubic Photon Ultra, Anycubic Photon D2, Elegoo Mars 4 DLP, and Asiga.

However, TGM-7 3D printing resin is not compatible with laser-based 3D printers like Formlabs or Peopoly Moai, which use Vat trays with PDMS silicone lining.

Given its innate durability and pliability, certain distinct 3D printing techniques need to be used when working with this resin. Presented below is a compilation of crucial guidelines AmeraLabs advise adhering to, aimed at preventing typical mishaps. Keep in mind that these instructions are exclusive to TGM-7 3D printing resin. Therefore, it remains essential to consistently implement all fundamental SLA 3D printing methodologies.

Clear Filters
AmeraLabs TGM-7 Grey AmeraLabs TGM-7 Grey
£48.00£346.80 (incl. VAT)
Select Options This product has multiple variants. The options may be chosen on the product page
Brands:
AmeraLabs
Item added to cart View Cart Checkout
Clear Filters
AmeraLabs TGM-7 Clear AmeraLabs TGM-7 Clear
£81.60 (incl. VAT)
Select Options This product has multiple variants. The options may be chosen on the product page
Brands:
AmeraLabs
Item added to cart View Cart Checkout

Use the attachment layer while ensuring it's thinness

As highlighted and elaborated in this blog article, AmeraLabs suggest using a thinner attachment layer for your SLA 3D printing endeavours.  For optimal results with TGM-7 3D printing resin, it is recommended to maintain the raft’s thickness at 2-4 standard layers. For instance, if you’re aiming for a 50um print, consider setting the raft’s thickness between 100-200um. TGM-7 exhibits robustness and resilience, thus eliminating any concerns regarding the removal of the attachment layer alongside the printed object from the build plate.

3D Junkie AmeraLabs TGM-7 Attachment Layer

Use appropriate cure times for initial layers

AmeraLabs TGM-7 showcases excellent bonding properties with conventional steel or aluminium build plates. Begin with initial/raft layers that receive 10-15 times the exposure duration of your standard settings. For instance, if your regular curing time is 5 seconds with 50um layers, opt for exposures of at least 50-75 seconds for the initial/raft layers. However, it’s important to note that exposure requirements might vary depending on your specific machine. Tailor these considerations to your unique expertise and outcomes.

Occasionally, extended exposures on printers equipped with monochrome LCDs and high-intensity light sources can lead to excessive adherence to the FEP film within your Vat. Therefore, evaluate your settings in alignment with your customary approaches.

Avoid large overhangs

TGM-7 possesses notable flexibility. Nevertheless, this inherent flexibility highlights a crucial aspect that demands attention: it’s advisable to steer clear of sizable, flat overhangs featuring extensive cross-sectional areas, even if proper support is in place.

These substantial overhangs with extensive layer areas tend to create challenges during the initial curing of the first layer. This layer becomes detached from the FEP film and due to its minimal thickness (approximately 50um or 100um), it becomes notably delicate and supple. This situation leads to ripples and irregularities, thereby complicating the adhesion of the subsequent layer, particularly if it shares the characteristics of being sizeable and flat. To gain a clearer insight into this, refer to the accompanying image.

Typically, resolving this matter isn’t overly complex. AmeraLabs’s suggestion is to slightly modify the orientation of your object. This straightforward adjustment can substantially alter the cross-sectional area pattern across all layers of the object. Even a minor alteration in orientation (around 10-15 degrees) can yield a notable impact.

Similarly, such subtle adjustments to the angle don’t significantly upheave the overarching support strategy for your object. Presented here are a few illustrative examples for you to observe. 

3D Junkie AmeraLabs TGM-7 Flexible FEP Separation

Always hollow your objects and place drainage holes properly

Hollowing is a crucial technique within SLA 3D printing. This approach not only conserves material but also facilitates smoother detachment of newly-cured layers from the FEP film. It’s advisable to employ a wall thickness within the range of 1.5-2mm.

Equally important is the mindful and precise placement of vent holes for hollowed items. This pivotal aspect holds true not only when working with TGM-7 3D printing resin.

Vent holes, often referred to as drainage holes, must be strategically positioned to ensure the effective draining of any trapped isopropyl alcohol during the cleaning process. Certain placements for vent holes are inherently incorrect, as shown in the accompanying diagram.

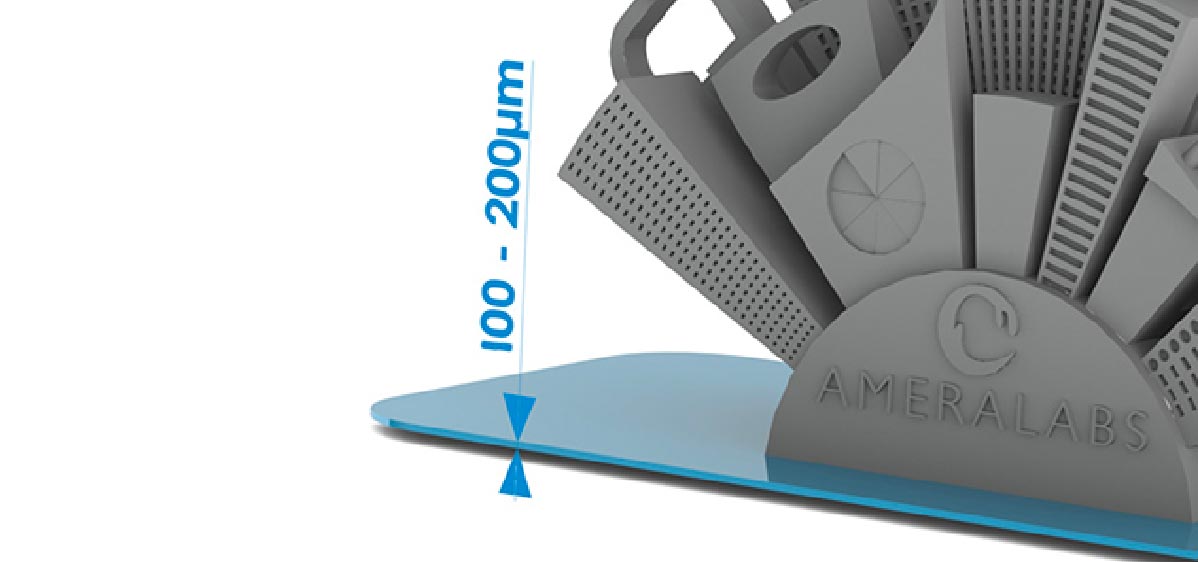
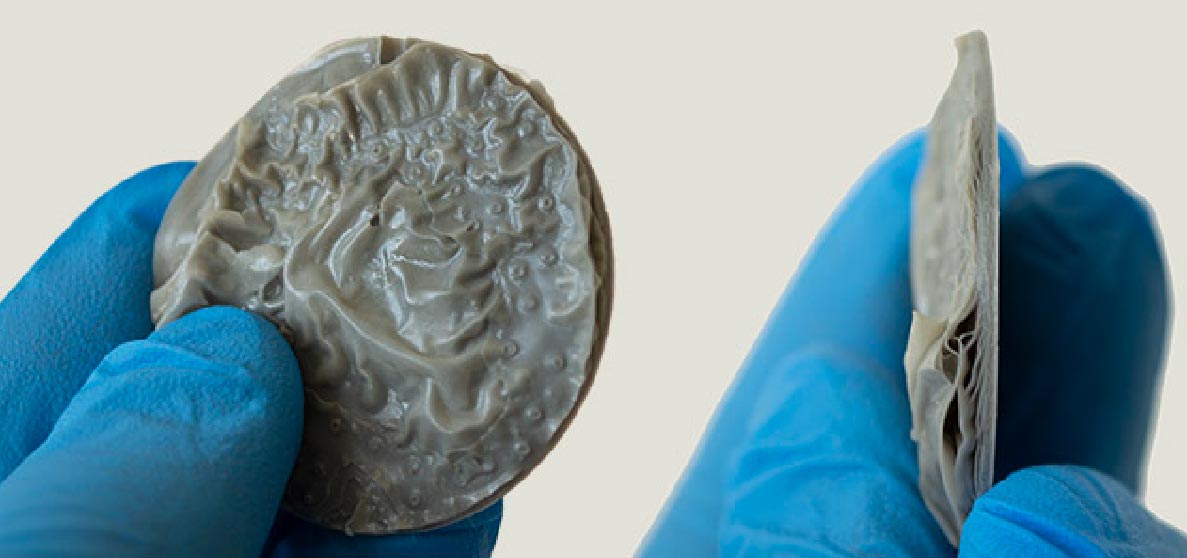
Placing vent holes in the red-marked positions carries the risk of entrapping IPA within the model, particularly if a thorough rotation during cleaning isn’t conducted. Even with active rotation, complete removal of trapped IPA might remain challenging. Extended presence of trapped IPA inside the model can adversely affect the 3D printed object. Over time, the enclosed IPA can modify the final polymer, resulting in significant damage to your 3D prints, such as fractures, warping, and dimensional loss. It’s worth noting that IPA is a solvent and its prolonged exposure can substantially impact the ultimate properties.

By placing vent holes in the green areas, you establish a seamless path for IPA to drain from the model. This approach effectively prevents its entrapment and the subsequent potential harm to the structural integrity of the 3D printed model.

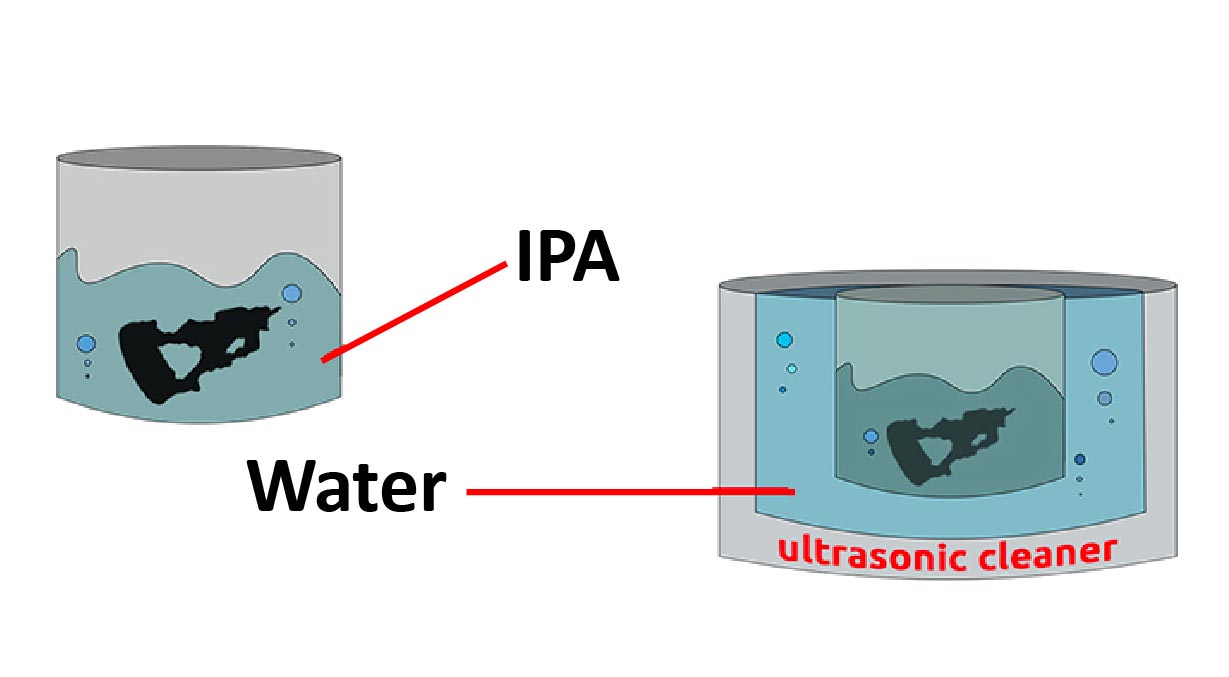
Completely removing all residual isopropyl alcohol (IPA) from the model is paramount. Only through this process can you expect enduring and consistent performance, applicable not only to TGM-7 3D printing resin but also across all types of 3D printing resins.

Apply the correct supports

As always, the significance of an appropriate support strategy remains significant. Incorrect support parameters can result in persistent failures. However, there’s no need for concern. AmeraLabs has put together essential recommendations to alleviate this concern for you!

Due to the flexibility of TGM-7, AmeraLabs recommend implementing the following aspects into your strategy of supports when printing with this resin.

  1. Set thicker struts for supports. We recommend a thickness of around 1.5-1.8mm.
  2. We recommend starting off with a tip diameter of 0.5 – 0.8mm.
  3. Always use inter-connected support algorithms.
  4. Start with a higher density of 80% – 90%.

You can adjust and experiment with the limits of these settings after you get more experience with TGM-7. It is recommend to use more conservative settings in order to get decent success at the beginning.

Support configuration files for Chitubox Slicer

This profile has three support modes and AmeraLabs suggest using them based on your specific 3D printed object and intended results.

  • Medium mode: This profile serves as AmeraLabs’ recommended starting point. It offers a well-balanced support tip thickness, catering to both seasoned users and newcomers. To simplify the process of removing supports, we strongly advise keeping pliers readily available.
  • Light mode: This profile features the most slender support tips. While support removal is uncomplicated, it demands careful planning and strategic orientation to achieve the minimal cross-sectional area of layers. Ideally suited for smaller objects, although instances of successful printing of larger ones have been observed as well. AmeraLabs strongly advocates adopting this profile once you’ve grown accustomed to TGM-7 and have attained a satisfactory success rate.
  • Heavy mode: This profile showcases support tips of greater thickness compared to alternative setups. It proves beneficial for larger objects with increased cross-sectional areas. The heightened support tip thickness contributes to maintaining accurate geometries and resilience against forces during the 3D printing process, preventing separation from FEP or PDMS. While this profile offers a greater margin for errors, it also presents slightly more complexity when it comes to support removal.

For all profiles, the recommended support density spans from 70% to 95%. Feel free to make manual adjustments if necessary. AmeraLabs recommend tailoring the density according to your requirements, as there are instances where the number of generated supports for certain objects can be excessive.

Click on the link to download the Chitubox profile for TGM-7.

Cleaning recommendations for TGM-7 3D printing resin

AmeraLabs TGM-7 has a higher viscosity than most 3D printing resins. However, it doesn’t make cleaning 3D printed parts with isopropyl alcohol (IPA) more difficult.

Extended soaking of TGM-7 resin in solvents should be avoided. It’s crucial to refrain from submerging items in IPA or any other liquid for over 40 minutes. Prolonged exposure in this manner could compromise your models and impact the ultimate polymer material properties.

If you own the Phrozen Wash & Cure Kit, you can easily clean 3D models printed with TGM-7.

If you prefer to clean your 3D prints in ordinary IPA baths, here is an easy 4-step procedure you can follow:

  1. After taking your printed object off the build plate, submerge it in the IPA bath for 10 minutes.
  2. Swirl the IPA bath with the printed object in it actively for another 1 minute. Make sure you wear protective gloves.
  3. After swirling, leave it still but fully submerged for another 10 minutes. At this point, it is recommended to change the IPA. 
  4. Finally, swirl the bath actively again for 1 minute.
3D Junkie AmeraLabs TGM-7 Cleaning 3D Prints

Evaluate cleaning results and repeat this procedure again  (if needed).

If you prefer cleaning your 3D prints with an ultrasonic cleaner, we recommend putting the printed object into a container with IPA, closing it well, and putting that container into the ultrasonic cleaner filled with water. Let it sit in an ultrasonic cleaner for no more than 10 minutes without additional heating.

Last but not least. If you have intricate cavities on your prints that need to be cleaned, following this 4 step procedure tends to produce better results than ultrasonic cleaning.

Post-curing

Following the 3D printing process, TGM-7  is actually relatively softer than many other resins. It’s important to subject it to post-curing within a UV chamber to ensure the curing process is complete. Given the non-brittle nature of the material, you have the option to post-cure it along with supports and remove them afterward. AmeraLabs suggest a post-curing duration of at least 15 minutes to 1 hour using 50W of 395-405nm LEDs. Immediate post-curing of parts once they’re dry after cleaning is very important. Prolonged storage of raw, non-post-cured parts is strongly discouraged.

After this, the post-curing surface of the TGM-7 printed object is completely non-sticky and scratch resistant.

Coating

Printed objects can also be coated with most modelling primers for further painting.
3D Junkie AmeraLabs TGM-7 Resin Primer Coating

Other recommendations

Please also be aware of several recommendations and warnings that relate to TGM-7 3D printing resin:

  • Properties of your final 3D printed and post-cured objects with this material can vary if exposed to extreme conditions such as high humidity, extremely dry air, and high temperatures (>60C) for prolonged periods of time.
  • Objects 3D printed with TGM-7 material, should not be used for models and parts that will constantly be in contact with water, organic solvents, etc.
  • DO NOT leave this material inside the resin tray of your 3D printer for prolonged periods. Even with most 3D printing resins, such long storage without air circulation can deteriorate coatings. This could happen when coatings that were used for 3D printers are not resistant to chemicals enough.

Newsletter Sign-Up

3D Junkie are an innovative UK 3D Printing company working with leading global brands including Phrozen, AmeraLabs, Eolas Prints, RevoPoint and Scott Bader.

Keep up to date with the latest trends in the world of 3D printing, and for the latest product releases by signing-up to our newsletter.

Original source: AmeraLabs TGM-7

Leave a comment